|
<< Click to Display Table of Contents >> Configuring Sections |
  
|
|
<< Click to Display Table of Contents >> Configuring Sections |
|
The Setup Sections dialog allows you to add, delete and configure sections in your report. This is also where you configure the data source associated with each section.
Because of the large number of options available for sections and data sources, the discussion of the Setup Sections dialog is broken-up into three chapters. Topics related to configuring sections are covered here while data source topics are covered in the next two chapters.
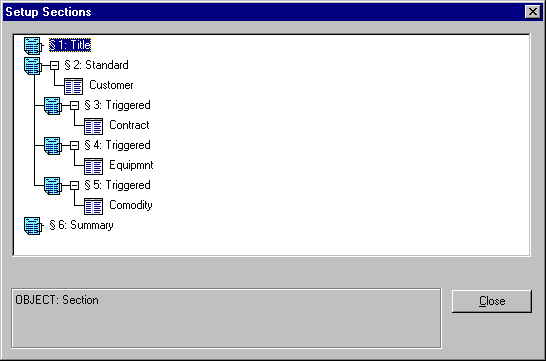
The Setup Sections dialog is accessed by choosing Sections from the File, Setup menu. The dialog consists of a hierarchical list box which shows all the sections of the report. It also displays the tables and queries that provide data to each of the sections. There are three icons that you'll encounter in the list box:
|
Represents a Section. |
|
Represents a SQL Query. |
|
Represents a Table. It is used for both local tables and tables that belong to a SQL query. |
Each object in the list box can have children and attributes. Children are objects that are owned by another object. They are always connected to lines coming straight down from the parent object. For example, figure 30 shows that Section 2 has three child sections.
Attributes are represented by lines going right and then downward. The lines are connected by boxes that contain either + or -. For example, data sources are attributes of sections. Figure 30 shows that Section 2 uses the Customer table.
If you wish to hide the children of an object, you can double-click on the object's icon and all its children will be hidden. You can also hide the attributes of an object by double-clicking the +/- box on the attributes line.
When you select an object by clicking the left mouse button on it, detailed information about the object is displayed on the status bar at the bottom of the Setup Sections dialog.
When you click the right mouse button on an object, a pop-up menu will appear with a list of features available for the selected object. You can also add objects to the list box via the pop-up menus. The options presented in the pop-up menu depend on which object you've selected.
The following options are available in the section pop-up menu:
Add Section
This menu allows you to add a section to the report. A section is like a sub-report that is embedded within the primary report. When you choose this option, you will be presented with a dialog to allow you to choose the type of section you wish to add.

The section types displayed in the dialog depend on which sections are already defined in your report. For example, since there can only be one Title and one Summary section, these section types will not be available if they have already been included in the report.
The following table provides a brief description of each section type.
Section Type |
Description |
Title |
This section consists of a single page that prints at the beginning of the report. It is useful for creating cover pages for a report. |
Standard |
This is a standard section. It does not support columns or perform Cross-Tab calculations. |
Label/Column |
This section is columnar in nature. Mailing address labels are a good example. You can also use this type of section to create a report that has multiple columns. |
Cross-Tab |
Cross-Tab sections are those that perform summary or arithmetical processing on a database and report the result set in a grid type fashion. |
Summary |
This type of section prints at the end of a report after all other sections have printed. It is primarily used to print summary information. |
The Triggered option creates a section that is a child of the highlighted section. Triggered sections are printed when an expression changes value. For example, you would use a triggered section to print a sub-report for each customer in the main report. In such a case you would specify the customer name or ID as the trigger expression. The Triggered option is only available for Standard, Label/Columnar and Cross-Tab sections.
The events that occur after you select a section type depends on which type of section you chose. If you selected a Title or Summary section, the sections are automatically added to the report with no user interaction. If you choose a Standard, Label/Column or Cross-Tab section you will be presented with a series of dialogs prompting you for data source information. When you choose a Cross-Tab section you are also prompted for Cross-Tab configuration information. See the chapter entitled Creating Cross-Tab Reports for more information on how to configure a Cross-Tab section.
If you choose the Triggered option, you will be prompted to specify the expression that triggers the section. A triggered section prints when the data returned by the trigger expression changes value. For example, if you are printing a customer listing report and you have a section that triggers on customer name, the section will print for each customer.
If, however, you sorted the report by the state where the customer resides, and you specify that the section triggers on state, then the section would print once for each state but not for each customer.
Delete Section
This option allows you to delete the currently highlighted section. This option is very straight forward but with one exception: you must always have at least one section (not including Title and Summary sections) in your report. When you delete a section, all its children sections are also deleted.
Header and Footer Bands
This option allows you to specify if a section has Header and Footer bands. When a section has Header and Footer bands, it always starts printing on a new page. Otherwise it prints continuously on the same page as either its parent section or the proceeding sequential section.
Without Header and Footer bands, a section has no page attributes or Background band of its own. So during the printing process it inherits these attributes from the previous section.
This option is not available for Title and Summary sections as they do not support Header or Footer bands.
Print When
The Print When option allows you to specify when a section prints. Selecting this option displays the Expression builder where you specify the Print When expression. This expression is evaluated during reporting when it is time for the section to print. If the expression evaluates to true the section is printed; otherwise it is skipped.
For example, assume that you have a customer listing report that contains a triggered section that prints for each customer. If you wanted the triggered section to print for customers with purchases that amounted to more than $10,000, you would specify a Print When of: "Customer.Purchases>10000".
Page Setup
The Page Setup option allows you to specify page related information like paper size, page orientation and the margin sizes. This option is only available for the Title section and any sections that have Header and Footer bands.

In general, the various settings in the Page Setup dialog are self explanatory. The Margin edits allow you to specify the margin sizes. The dimension of the margins will be inches or centimeters depending on which mode the report is in.
The page size settings allow you to set the paper size, paper source and orientation of the current section. The selections available in the lists reflect those of the current printer.
Selecting the Custom Size check box will enable the Width and Height edits where you can specify custom paper sizes. Custom paper sizes are not supported on most printers and are primarily used to specify custom sizes for continuous feed labels on dot matrix printers.
Trigger
This option allows you to edit the trigger expression that was specified when a triggered section was created. This option is only available for triggered sections. For more information on Triggered sections see the discussion under "Add Section".
Column/Label Setup
When you select this option, you are presented with the Column/Label Setup dialog. This dialog allows you to specify the label or column attributes of a section. This feature is available for all sections except the Title and Summary sections.
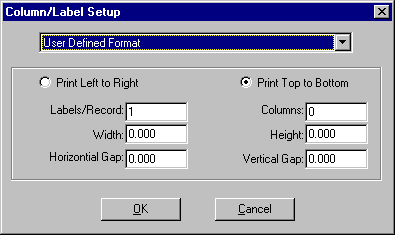
The drop-down list box at the top of the dialog contains a listing of standard Avery labels. You can select one of the pre-defined label types to have the label attributes automatically initialized or User Defined Format to define your own attributes.
When you select the User Defined Format the controls in the lower section of the dialog become enabled. The purpose of each control is defined in the following table:
Control |
Description |
Print Left To Right and Print Top To Bottom |
These radio buttons control the direction in which the labels print. If the Print Left to Right button is selected then the labels print all columns from left to right and then move to the next row. If the Print Top To Bottom button is selected, ReportPro prints all labels in the first column and then moves to the next column. |
Labels/Record |
This option allows you to specify the number of labels that get printed for each record in the data source. For example if you were printing a customer address listing and you wanted to print two labels for each customer, you would specify two in the Labels/Record edit control. |
Columns |
Here you specify the number of columns you wish to print on each page of the report. |
Width |
Here you specify the width of each label. |
Height |
Here you specify the height of each label. |
Horizontal Gap |
In this edit control, you specify the horizontal distance between labels or columns. |
Vertical Gap |
This edit allows you to specify the vertical distance between labels. |
Sort Order and Optimize Sort Order
The Sort Order and Optimize Sort Order options work together to allow you to specify how data from a section's data source is sorted. ReportPro allows you to sort your data on multiple fields in either ascending or descending orders.
An ascending sort means the resulting sort will look like "A", "B", "C" or 1, 2, 3. A descending sort will produce results like "C", "B", "A" and 3, 2, 1. When ReportPro sorts data from local tables, the sort is case independent meaning that "c" and "C" will be sorted to the same location. Whether or not data sorted by a SQL server is case independent depends on how the server was configured.
Selecting the Sort Order option here is the same as selecting the Order menu option from ReportPro's main menu except the Order menu option sets the sort order for the displayed section while the Sort Order pop-up menu option allows you to set the sort order for any section in the report.
When you select the Sort Order option, you are presented with a dialog that allows you to specify the sort criteria.
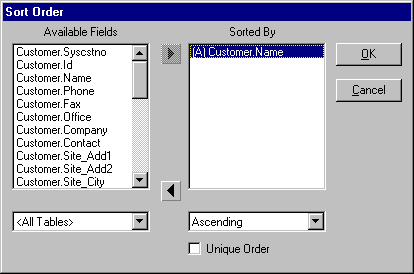
To specify a sort order, highlight the field in the Available Fields list box that you wish to sort on and click on the > button . The field will be added to the Sorted By list box.
Fields in the Sorted By list box have an indicator next to them that identifies if the field will be sorted in ascending or descending order. "(A)" indicates an ascending sort order, while "(D)" indicates descending. To change the sort method, highlight the Sorted By field you wish to change, and select the desired method from the combo box locate at the bottom of the dialog.
More than one field can be specified in the Sorted By list box. Any subsequent field creates a sub-sort of the previously listed fields.
The Unique Sort option forces ReportPro include only unique values in the sort order. For SQL data sources this causes the "Distinct" clause to appear in the SELECT statement.
ReportPro is capable of sorting information from dissimilar data sources. When you sort information from different sources, ReportPro must retrieve all the information from the data sources and store the information on a local hard drive. Though this is an extremely power feature, it can require a large amount of disk space and processing time depending on how much information is being gathered.
If the Optimize Sort Order option is selected, ReportPro will query the database driver to determine if the driver can sort the data. In most cases, the driver can sort the data and this dramatically speeds up the sorting process. If the driver cannot handle the sorting process, ReportPro will automatically create the sort.
Occasionally ReportPro may not be able to properly determine if the driver can sort the data. ReportPro will incorrectly assume the driver can perform the sort and an error will result. In this instance you should deselect the Optimize Sort Order option and have ReportPro sort the data for you. Otherwise, you should always leave the Optimize Sort Order option selected.
Filter and Optimize Filter
The Filter and Optimize Filter options work together to limit the data that is included in the report. When you select the Filter option the expression builder is displayed to allow you to enter a filter expression. The filter expression must return a logical value (i.e. the expression must be either true or false).
The filter expression is evaluated prior to printing each record. If the expression evaluates to true, the record is printed; if not, the record is skipped.
Selecting the Filter option here is the same as selecting Filter from ReportPro's main menu.
If the Optimize Filter option is selected, ReportPro passes the filter expression to the database driver for processing. In many cases this greatly improves reporting speeds. For local CDX tables, the driver will try to use bit mapped query optimization to speed up the query. Many SQL data sources also support query optimization.
If you want to filter on an expression that is not supported by the database driver, you can deselect the Optimize Filter option and have ReportPro perform the filtering.