|
<< Click to Display Table of Contents >> Creating a Standard Report |
  
|
|
<< Click to Display Table of Contents >> Creating a Standard Report |
|
This section covers the steps required to create a standard report. The other report types are covered in subsequent sections.
Defining the Data Source
After you choose the File, New, Standard Report menu option, a ReportPro work window will appear along with a series of dialogs prompting you for information. The first dialog you will encounter is the database driver dialog. This dialog allows you to specify format of the database.
ReportPro natively supports FoxPro™, dBase™ and CA-Clipper™ file and index formats via Replaceable Data Driver (RDD) technology. ReportPro uses Open Database Connectivity (ODBC) technology to access SQL data sources. In general, ReportPro works the same regardless of which database driver you select. SQL data sources do require a few addition steps when a report is created. Please see the chapter "Using an ODBC Data Source" for more information on how to create an ODBC report.
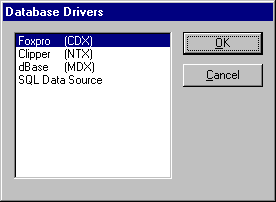
From the Database Drivers dialog, select the desired driver by clicking the driver name with the mouse and then clicking the OK button. Alternately you can double-click the left mouse button on the desired database driver.
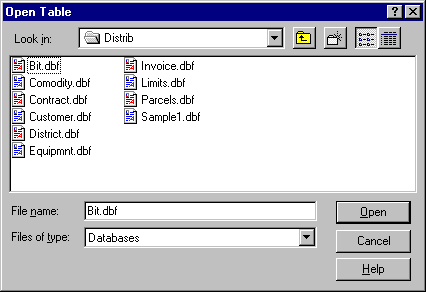
When you select one of the RDD drivers (CDX, NTX or MDX), another dialog will appear prompting you to select the primary table. Select the desired table and click the Open button. If ReportPro cannot open the table using the driver you selected earlier, you will be asked to choose another driver.
After you have successfully opened the primary table, ReportPro will enter an idle state where it is waiting for you build the report.
Adding Report Objects
The next step is to place report objects on the work window. Normally report objects are drawn on the work window. You start the process by selecting the desired drawing tool from the Tools, Drawing Tools menu or the toolbar. After you have selected the appropriate drawing tool, left click the mouse in the work window, then move the mouse while continuing to hold the left mouse button down. You'll notice that the object is drawn as you move the mouse.
When you release the left mouse button, the object will be created. In some cases, you will be prompted for additional information. For example, if you are drawing a Field object, you will need to specify the Field object's expression once you have finished drawing the object. For a Text object, you will need to type in the text.
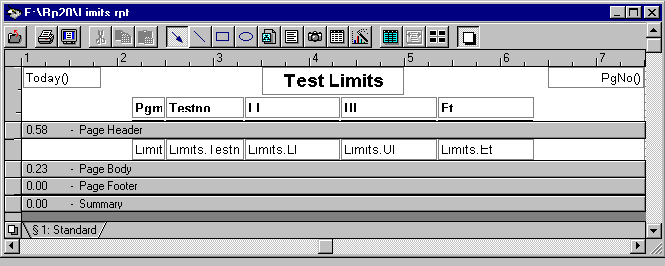
The objects you draw in the work window depend on the type and format of the report you are creating. If you are creating a simple listing report, you generally draw Text objects in the Page Header band to represent the report title, and the column headings. In the Page Body band you place Field objects that extract information from the data source.
The figure below shows what a simple listing type report might look like.
For a form based report, you would might reduce the size of the Page Header and Page Footer bands to zero and increase the Page Body band size to equal the size of the paper you are printing on. You would then proceed to mix Text and Field objects in the Page Body band to generate the proper form design.
As you draw the report objects, you may find ReportPro's Grid and Snap-to-Grid handy. Both of these features are available from the Tools menu.
Customizing Your Report
After you have added the report objects you'll probably want to customize the report. ReportPro supports many options to allow you to tailor the report to meet your needs. One thing you'll probably want to do is modify the data source by defining a sort order or filter. These options are available on ReportPro's menu bar.
Next you may wish to customize the report objects by adding shadows or borders. The object attributes are available on pop-up menus. You access an object's pop-up menu by right clicking the mouse over the object.
The report creation process is iterative, and you don't have to create the report in the order discussed here. ReportPro's design interface is flexible enough to allow you to create the report in almost any sequence.