|
<< Click to Display Table of Contents >> Report Wizard - Fields Tab |
  
|
Report Wizard - Fields Tab
|
<< Click to Display Table of Contents >> Report Wizard - Fields Tab |
|
The Fields tab is where you identify which fields are to be included in your report.
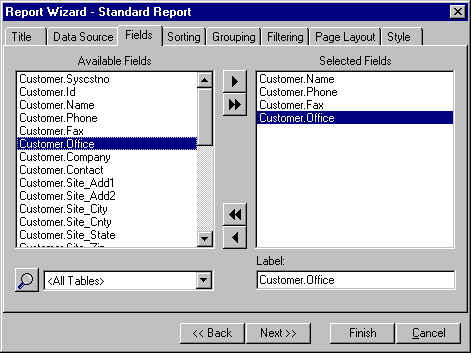
The Available Fields list displays the fields that are available from the data source that you configured in the Data Source tab. You specify which fields to include in your report by adding them to the Selected Fields list.
There are several ways to add fields to the Selected Fields list. The single right arrow ![]() moves the highlighted field from the Available Fields list to the Selected Fields list. The double right arrow
moves the highlighted field from the Available Fields list to the Selected Fields list. The double right arrow ![]() copies all fields from the Available Fields list to the Selected Fields list. You can also add a field by highlighting it and while holding down the left mouse button, dragging it to the desired position in the Available Fields list.
copies all fields from the Available Fields list to the Selected Fields list. You can also add a field by highlighting it and while holding down the left mouse button, dragging it to the desired position in the Available Fields list.
If you mistakenly add a field into the Selected Fields list, you can remove it by highlighting it and pressing the single left arrow ![]() . You can remove all fields by clicking the double left arrows
. You can remove all fields by clicking the double left arrows ![]() . You can also move fields between lists by double-clicking them with the left mouse button.
. You can also move fields between lists by double-clicking them with the left mouse button.
The order of the fields in the Selected Fields list is used to determine how fields are placed on the report. You can modify the field order by clicking the left mouse button over the desired field and while holding the mouse button down, dragging the field to the desired position in the list box.
The Field Browser button displays a dialog that shows sample data for the highlighted field in the Available Fields list. This feature is useful because it is not always easy to remember the data type of all fields in a database.
The Tables list box allows you to limit the fields displayed in the Available Fields list box to those of a single table or query. This feature is useful when you are creating a report that uses more than one table. To specify a table filter, click on the down arrow on the list box and choose the desired table. If you wish to see the fields for all tables select the <All Tables> entry.
The Label edit allows you to specify a heading or label for each field. Labels are used in listing and form based reports to identify the fields. If you choose to create a listing style report, the label will be placed in the Page Header band directly above the field. If you choose a form style report the label will appear to the left of the field.
Labels default to the field name, but you may wish to specify a more readable name. To modify a label, click the desired field in the Selected Fields list box with the left mouse button and type in the desired text in the Label edit.
Also See: